Ring doorbell spring installation guide for safer front entries
Planning your Ring doorbell spring installation around renovation work
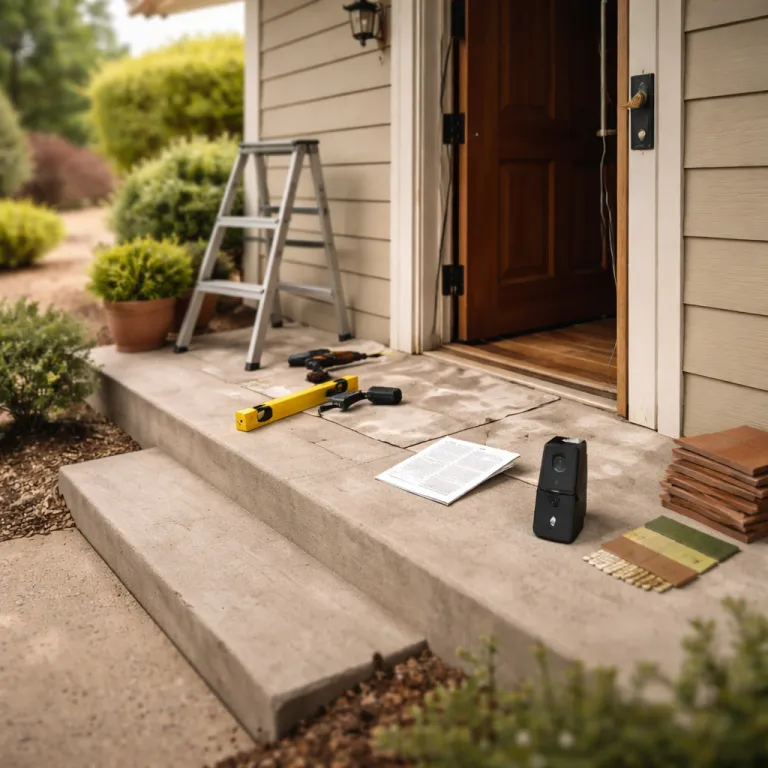
Spring is often the ideal season to install or upgrade a Ring video doorbell because your ladders, drills, and paint gear are already out for exterior projects. When you schedule the new smart doorbell alongside repainting, masonry repairs, or a front step refresh, you can run wires and upgrade the transformer without opening the wall twice. This coordinated approach keeps the installation tidy, reduces disruption, and lets your family move straight into a safer routine once the renovation dust settles.
Start by deciding whether you want a wired Ring doorbell or a battery powered model, because that choice shapes every later decision about wiring, mounting, and long term maintenance. A fully wired doorbell connects to your existing chime and transformer, while a battery model can still use a low voltage supply through the same terminals but does not rely on it to keep working. For most security conscious households renovating in spring, a hardwired Ring unit on a solid mounting bracket is the most dependable option over many seasons.
Before any installation work, shut off power at the breaker and test that the old doorbell is not working, as this is a basic but critical safety step. Remove the existing doorbell from the wall and gently pull the wires forward so you can inspect their condition and the contact points on the back of the old unit. If the copper looks blackened, corroded, or brittle, plan to trim and re-strip the wiring so the new Ring doorbell has clean metal at its screw terminals.
Spring renovations are also the perfect moment to upgrade the transformer that feeds your directly wired doorbell, especially if it is an older 10 volt unit struggling with modern loads. Ring’s own support documentation and independent testers such as Consumer Reports note that many current video doorbells perform more reliably on a transformer rated around 16 to 24 volts AC, typically in the 10 to 40 VA range, which gives the camera, Wi-Fi radio, and app features enough power to stay responsive (based on Ring Help Center guidance and Consumer Reports product testing summaries as of 2023). Ask a licensed electrician to replace the transformer while other electrical work is already scheduled, because combining jobs usually reduces both disruption and cost and keeps you compliant with local electrical code.
Choosing the right Ring doorbell mounting position, bracket, and angle
Once the electrical side is planned, focus on where and how the Ring doorbell will sit on your wall or brick facade. The goal is simple: you want the camera to see faces clearly, watch parcels on the ground, and avoid constant motion alerts from passing cars or fast-growing spring vegetation. That means thinking about height, angle, and the type of mounting bracket or bracket mount you use, not just the colour of the faceplate.
For most homes, mounting the doorbell between 1.2 and 1.4 metres from the ground gives the best balance between facial detail and package visibility. If your entry steps are high or the path slopes, you may need an angled bracket mount to tilt the Ring doorbell slightly down or sideways so it frames the approach rather than the street. Families on busy roads often benefit from a wedge style mounting bracket that turns the camera away from traffic and towards the front door, which reduces false alerts and keeps the app usable.
Brick, render, and timber all hold screws differently, so match the supplied mount hardware to the actual wall material. On brick or block, drill pilot holes with a masonry bit, tap in the wall plugs, then fasten the bracket with the longer screws so the mount does not loosen as temperatures swing between cool spring nights and warmer days. On timber trim, shorter screws into solid wood usually give a firmer hold, but avoid rotten or cracked sections that could fail under the weight of the doorbell over time.
Think about sightlines as you test the mounting position by holding the Ring doorbell where you plan to install it and checking the live view in the app. Ask someone to walk up the path, bend to pick up an imaginary parcel, and stand to one side, then adjust the bracket mount until the framing looks natural in the app preview. This quick rehearsal during your seasonal upgrade helps you avoid re-drilling the wall later when plants grow, shadows change, and your family is relying on the camera every day.
Wiring, terminals, and safety for a reliable spring upgrade
With the position fixed, you can move to the practical wiring steps that make the Ring doorbell more than just a pretty gadget. Pull the low voltage wires through the centre of the mounting bracket, leaving enough slack to work comfortably without stressing the contact points. Loosen the small screws on the back of the Ring doorbell, wrap each conductor clockwise around its terminal, then tighten until the wiring is snug but not crushed.
Always keep the power off while you are working on these terminals, because even low voltage doorbell wiring can spark if the conductors touch. If you see frayed strands, twist them neatly or trim and re-strip so each wire has a clean, solid end that will hold under the screw head. When both wires are secure, gently tug them to confirm they will not pull free as you mount the doorbell onto the bracket.
On brick or uneven render, check that the mounting bracket sits flat before tightening the screws, since a twisted bracket can stress the wiring and weaken the long term hold. Use all the supplied screws so the mount spreads the load across the wall, especially if your entry is exposed to wind or frequent door slams. A stable bracket mount protects both the doorbell and the wiring from micro movements that can loosen contact over months of use.
Once the Ring doorbell is clipped onto the mount, restore power at the breaker and wait for the status light to show that it is working. Open the Ring app, follow the prompts to connect the doorbell to Wi-Fi, and run a quick test call from your phone while someone presses the button outside. If anything seems unreliable, such as the chime not ringing or the app failing to connect, revisit the wiring, transformer capacity, and chime compatibility checklist before you finish the rest of your spring renovation list.
Tuning the app, lighting, and wider security plan for spring
Hardware is only half of a successful Ring doorbell spring installation, because the app settings and lighting plan determine how useful the camera feels in daily life. Once the doorbell is online, open the Ring app and walk through the motion zone setup while someone moves around your front path, driveway, and porch. Shape the detection areas so they ignore the street but still cover the spots where parcels sit and children play, then save a profile you can adjust as plants grow through the season.
Spring is also the right time to rethink exterior lighting, since a camera without light will always struggle after dark. Pair the Ring doorbell with a motion activated porch light or a nearby smart floodlight, aiming the beam so it illuminates faces and the ground without shining directly into the lens. This combination of camera and light makes night footage clearer, helps visitors feel welcome, and discourages opportunistic thieves who prefer to work in shadows.
For security conscious families building a full Ring ecosystem, consider whether a second camera might serve you better than a more expensive doorbell model. A basic wired Ring doorbell at the front, combined with a side alley camera or driveway unit, often covers blind spots that a single premium doorbell cannot see. The goal is not the flashiest spec sheet but a front entry that simply works, so you forget about the hardware and focus on who is at the door.
Finally, remember that Ring is part of Amazon Technologies LLC, so your account, app, and data all sit inside a larger platform that needs careful password and privacy management. Use strong authentication, review which family members have access in the app, and periodically check notification settings so important alerts do not get lost among less urgent pings. Treat this spring upgrade as a full safety check for your digital front door as well as the physical one, and you will get lasting value from every screw, bracket, and wire you installed.
Key statistics on smart doorbells and package theft
- Package theft is widespread: a 2023 Security.org survey estimated that roughly 49 million Americans experienced at least one parcel theft in the previous 12 months, with self-reported losses of about $8 billion in value across the United States (figures based on Security.org’s 2023 “Package Theft Statistics” report, which relies on consumer survey data rather than police records).
- Home improvement activity peaks in spring months, with industry groups such as the Home Improvement Research Institute and major retailers consistently reporting higher demand for exterior upgrades, including smart doorbell installations, as weather improves and daylight hours increase.
- Video doorbells form part of a layered security approach that can support deterrence and evidence gathering when combined with lighting, additional cameras, and visible security signage, as highlighted in guidance from security providers and consumer safety publications.
Frequently asked questions about Ring doorbell spring installation
Should I choose a wired Ring doorbell or a battery model during spring renovations ?
If you are already opening walls or repainting exteriors in spring, a wired Ring doorbell is usually the better long term choice. You can upgrade the transformer, tidy the wiring, and hide cables while other work is happening, which means fewer visible conduits and no need to recharge batteries. Renters or those avoiding electrical work may still prefer a battery model, but homeowners renovating should strongly consider wiring the doorbell directly and confirming that the existing chime and transformer meet Ring’s published specifications.
What height and position work best for mounting a Ring doorbell on brick ?
On a brick wall, aim to mount the Ring doorbell between 1.2 and 1.4 metres high, close to the main handle side of the door. Use the supplied mounting bracket and masonry screws, drilling pilot holes into the brick rather than the mortar for a stronger hold. If your steps are high or the street is busy, add an angled bracket mount so the camera looks at visitors and parcels instead of passing traffic.
Do I need to replace my old doorbell transformer when installing a Ring doorbell ?
You may need to replace an older 10 volt transformer, because many Ring doorbell models perform more reliably on a 16 to 24 volt AC supply in the 10 to 40 VA range, as outlined in Ring’s support documentation and echoed by Consumer Reports testing (both sources summarised here for general guidance only). During spring renovations, ask an electrician to inspect the existing transformer and confirm its output, capacity, and condition. If it is underpowered, damaged, or very old, upgrading it while other electrical work is underway is usually safer, more code compliant, and more cost effective.
How can I avoid constant motion alerts from my Ring doorbell in spring and summer ?
Use the Ring app to draw custom motion zones that exclude the street, swaying trees, and busy pavements while focusing on your path and porch. After your Ring doorbell spring installation, revisit these zones once or twice as plants leaf out and shadows change, adjusting sensitivity so you still catch visitors and deliveries. Combining tuned motion zones with a well aimed exterior light usually cuts false alerts dramatically while keeping important events visible.
Is a single Ring doorbell enough, or should I add extra cameras ?
A single Ring doorbell covers the immediate front entry, but it cannot always see side paths, driveways, or dark corners where people might approach. For families investing in a broader security setup, pairing a basic wired Ring doorbell with one or two strategically placed cameras often gives better coverage than buying only a premium doorbell. Think of the doorbell as the front gatekeeper and extra cameras as the perimeter guards that complete your spring security plan.
Trusted references
- Scientific American
- KPS Alarms
- Consumer Reports
Step-by-step Ring doorbell spring installation checklist
- Turn off power at the breaker and confirm the existing doorbell is inactive.
- Remove the old doorbell, pull the low voltage wires forward, and inspect the copper.
- Decide on wired versus battery powered Ring doorbell based on your renovation plans.
- Have a licensed electrician assess the transformer and replace it if it does not meet Ring’s voltage and VA recommendations.
- Mark the mounting height and position, then drill pilot holes and fix the bracket securely.
- Thread the wires through the bracket, attach them to the Ring terminals, and check each connection.
- Clip the Ring doorbell onto the bracket, restore power, and complete setup in the Ring app.
- Adjust motion zones, test notifications, and fine tune exterior lighting for clear video.
Safety and legal reminder: Always follow local electrical code, use appropriate tools and protective equipment, and consult a qualified electrician if you are unsure about wiring, transformer sizing, or chime compatibility. This guide is for general information only and does not replace professional advice.
Structured data, image alt text, and FAQ schema for Ring doorbell content
Example image alt text for this topic could include: “Homeowner completing Ring doorbell spring installation on brick wall,” “Electrician upgrading doorbell transformer for Ring video doorbell,” or “Ring smart doorbell mounted at correct height beside front door.” Use descriptive alt attributes that mention the Ring doorbell, the mounting surface, and the seasonal installation context.