Choosing the right Ring doorbell installation path for your home
Before you touch a single doorbell screw, decide how you want the Ring doorbell installation to fit your daily routine and your comfort level with wiring. A battery powered Ring doorbell is forgiving for renters and first timers, while a wired video doorbell that uses an existing chime transformer demands more planning but gives you constant power and no charging breaks. Think about whether you prefer a simple smart doorbell mounted on the wall with a plug adapter and wireless chime, or a more advanced Ring device that ties into your existing doorbell wiring and low voltage electrical system.
For many people upgrading from an older battery powered Ring device, the key step is understanding the limits of their current doorbell and transformer. Ring Video Doorbell Pro and similar wired models typically require a stable 16 to 24 VAC chime transformer rated at least 30VA, and older houses often hide a 10 volt transformer that simply cannot deliver enough power for reliable setup and operation. If you skip this early installation check, you may spend hours on app troubleshooting when the real fix is behind a wall or near your electrical panel rather than in the Ring app.
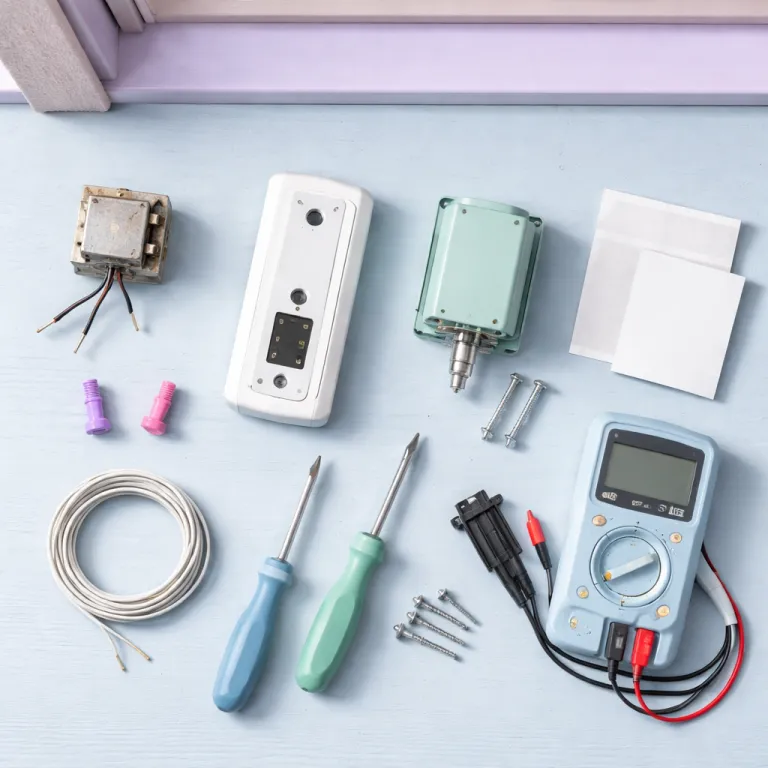
Think about mounting options before you even open the screws bag or pick up a drill bit. A corner kit or wedge kit can angle the device so the camera sees faces instead of just the street, and these small plastic parts often matter more than raw video doorbell resolution. If your doorway is recessed or your wall is textured brick, plan for wall anchors, longer mounting screws, and possibly professional installation so the Ring doorbell stays secure and aligned over time.
Battery Ring doorbell installation: fast setup without touching your transformer
If you are starting with a battery powered Ring doorbell, the first step is to charge the battery fully before any mounting or setup. Slide the battery into the device until you hear a firm click, then tap through the Ring app to add a new Ring device and follow the on screen prompts for Wi Fi and account configuration. This approach keeps the installation process focused on software and placement rather than on power and wiring, which is ideal for renters or anyone nervous about a chime transformer.
Once the Ring app recognizes your video doorbell, walk outside and hold the device against the wall where you expect to mount it. Use the built in level and the small arrow markings on the mounting bracket to learn how high you should place the doorbell so visitors appear centered in the frame. When you are satisfied, mark the holes, pick the right drill bit for your wall type, and use wall anchors and mounting screws from the screws bag to secure the bracket before you set the device onto it.
After mounting, slide the Ring doorbell down onto the bracket until it locks, then use the tiny security screws to secure the bottom edge. Open the app again, tap the live view, and check that the doorbell button is easy to reach and that motion zones cover your path but not the whole street. If you want extra guidance on camera placement and safe drilling technique, a detailed doorbell camera installation tutorial is available in a front door safety installation guide, which complements the official installation steps in the Ring documentation.
Upgrading from battery Ring to wired Pro: transformer, chime, and real power
Moving from a battery powered Ring device to a wired Ring Pro is less about the shiny new doorbell and more about the hidden transformer that feeds it. Ring Pro requires a stable 16 to 24 VAC chime transformer with a minimum rating around 30VA, while many older homes still run a 10 volt unit that was fine for a simple mechanical chime but will starve a modern video doorbell. Before you even remove your old doorbell hardware, you should learn where the transformer sits, what its voltage label shows, and whether it can safely power the new Ring device.
Transformers often hide behind the existing chime on an interior wall, in a basement near the electrical panel, or in a junction box close to the front door. Do not trust only the basement story from a previous owner, because houses get remodeled and the transformer can migrate over decades while the tale stays the same. Look for a small metal or plastic block marked with something like “16VAC 30VA” or “10V 10VA,” then, if you are comfortable and understand basic electrical safety, you can use a multimeter set to AC voltage, place the probes on the transformer screws, and check that you see something in the 16 to 24 volt range before you take the next step connecting any new wiring.
If the reading is too low or unstable, plan either a transformer replacement or professional installation by a licensed electrician who understands doorbell loads and wire gauge. When you or a pro swap the transformer, pay attention to wire nut connections and conductor size, because loose joints or undersized wire can cause intermittent power drops that the Ring app will only show as random offline events. One installer summed it up simply after fixing a flickering Ring Pro: “The doorbell was fine; the tired 10V transformer and loose wire nuts were the real problem.” For a practical, story driven walkthrough from transformer check to first chime, many upgraders find it useful to follow a detailed weekend project such as a transformer to first chime installation diary, which mirrors the real world quirks you rarely see in marketing photos.
Wiring, mounting, and securing a wired Ring doorbell Pro
Once you have confirmed that your chime transformer delivers the right power, you can focus on the physical installation of the wired Ring doorbell Pro. Turn off power at the breaker that feeds the transformer, then verify with a multimeter that the low voltage terminals at the chime and transformer read close to zero volts before you touch any conductors. After confirming power is off, remove the old doorbell, and gently pull the two low voltage wires through the opening in the wall so they are easy to reach. If the hole is rough or oversized, use the provided wedge kit or corner kit backplates not only for angle adjustment but also to cover gaps and give the mounting screws something solid to bite into.
Hold the new mounting bracket against the wall, use a level and the molded arrow indicators to align it, then mark the screw holes. For masonry or stucco, pre drill with the correct drill bit and insert wall anchors before driving the mounting screws, because this is what keeps the device secure against wind, vibration, and years of button presses. When the bracket is solid, strip a small amount of insulation from each wire if needed, then connect them to the terminal screws on the back of the Ring device, making sure there are no stray strands that could short. A simple mental wiring diagram is: transformer low voltage wires go to the chime and to the two terminals on the video doorbell, with each conductor landing under a single screw and no bare copper touching anything else.
With the wiring complete, gently push any extra wire back into the wall, then set the device onto the bracket from top to bottom until it clicks. Use the included security screws from the screws bag to lock the doorbell housing in place, restore power at the breaker, and wait for the Ring doorbell to light up. Open the Ring app, tap to start setup, and follow the installation prompts until the video doorbell joins your Wi Fi and you can test both the mechanical chime and any linked Ring Chime or smart speaker alerts.
Fine tuning chimes, adapters, and smart power for a stable Ring ecosystem
After the physical installation, the next step is to refine how your doorbell behaves with chimes, adapters, and other smart devices in your home. If you keep a mechanical chime, you may need a Ring chime adapter or a bypass kit depending on your specific wiring diagram and whether the chime transformer can handle the extra load. In some setups, especially with older chimes, it is cleaner to bypass the mechanical unit entirely and rely on a Ring Chime, smart speakers, and phone notifications managed through the Ring app.
For plug in alerts, place a Ring Chime or similar device in a central hallway and use a plug adapter only if the outlet shape demands it, because every extra adapter is another potential loose connection. In the app, tap the chime settings, link it to your Ring doorbell, and test different tones and volumes until you can hear the alert from key rooms without it becoming intrusive. If you are running several Ring devices, such as cameras and multiple doorbells, consider how they share your Wi Fi and power, and whether a mesh router or upgraded transformer would give more stable results.
Homeowners who want to reduce battery swaps or add resilience often pair their battery powered units with solar accessories that keep the battery topped up in normal daylight. A detailed explanation of how a Ring solar panel maintains power for cameras and doorbells over the long term is available in a solar power for Ring devices guide, which helps you learn when solar makes sense versus relying only on wired power. Whatever mix you choose, always secure cables, avoid overloading outlets with multiple plug adapters, and periodically review the app’s device health section to catch voltage or Wi Fi issues before they turn into missed visitors.
When to call a professional and how to future proof your setup
Not every Ring doorbell installation should be a do it yourself project, especially when your home wiring is old, undocumented, or visibly damaged. If you open the chime box and see brittle insulation, confusing splices, or a transformer without clear markings, that is a strong signal to seek professional installation rather than experimenting with live power. A qualified electrician can replace the chime transformer, check wire gauge, and ensure that every step connecting the new device meets local electrical codes and safety standards.
Future proofing starts with choosing a transformer that comfortably supports your current video doorbell and any likely upgrades, instead of one that only barely meets the minimum voltage. Ask the electrician to install a modern 16 to 24 VAC transformer with enough VA rating for at least one wired Ring Pro and a mechanical chime, and to use proper wire nuts and junction boxes so future work is straightforward. This way, when you later set Ring devices such as additional cameras or a second doorbell, you will not need to reopen walls or rework the same connections.
On the software side, keep the Ring app updated, review motion and chime settings after any major home change, and periodically learn from the device health reports that show voltage, Wi Fi strength, and uptime. Treat each new Ring device as part of a system, not an isolated gadget, and think about how mounting, screws, adapters, and power all interact over years rather than weeks. Done well, the result is not just a shiny smart doorbell on your wall, but a quiet, reliable entryway guardian that you rarely need to touch once the initial installation work is complete.
FAQ: Ring doorbell installation and transformer checks
How do I know if my transformer can power a wired Ring Pro ?
To check whether your transformer can power a wired Ring Pro, first locate it near the chime, in the basement, or by the electrical panel. With power off at the breaker and the cover removed, confirm the label shows 16 to 24 VAC and a suitable VA rating, such as 16VAC 30VA, which is a common minimum for a modern video doorbell. If you are experienced and follow electrical safety practices, you can then restore power and briefly use a multimeter set to AC voltage to measure across the two low voltage screws on the transformer to verify the reading.
Where is my existing doorbell transformer likely to be hidden ?
Most homes hide the doorbell transformer in one of three places, which are above or beside the interior chime, on a junction box near the main electrical panel, or in a utility space close to the front door. Sometimes it is mounted in an attic or crawl space, especially in older properties that have been remodeled. If you cannot find it visually, follow the low voltage doorbell wires from the chime or button until they lead you to the transformer.
When should I call a professional for Ring doorbell installation ?
You should call a professional installer or electrician when the wiring looks damaged, the transformer rating is unclear, or you are uncomfortable working near live electrical components. Professional installation is also wise if you need to upgrade the transformer, bypass a complex mechanical chime, or run new low voltage cable through finished walls. Paying for expert help once is often cheaper than repairing damage from an incorrect step connecting wires or overloading a circuit.
Can I keep my mechanical chime when installing a Ring doorbell Pro ?
In many cases you can keep a mechanical chime when installing a Ring doorbell Pro, provided the transformer meets Ring’s voltage and power requirements. Some setups require a chime adapter or a bypass kit, which changes how the chime is wired so the smart doorbell controls it safely. Always follow the specific wiring diagram for your chime type, and test the chime thoroughly in the Ring app after restoring power.
What tools do I need for a typical Ring doorbell installation ?
A typical Ring doorbell installation requires a drill, an appropriate drill bit for your wall material, a screwdriver, and possibly wall anchors and mounting screws if you are fixing the bracket to masonry or plaster. For wired models, a multimeter is very helpful for checking transformer voltage and confirming that power is off before you touch any conductors. The supplied screws bag, corner kit or wedge kit, and the Ring app on your phone complete the basic toolkit for most homes.