Understanding Your Ring Doorbell Model
Identify Your Specific Model
Before you embark on your journey to wire your Ring video doorbell, it's essential to know exactly which model you are working with. Each Ring doorbell model comes with its own unique installation requirements, particularly when it comes to wiring and power needs. Understanding these distinctions will not only streamline your install process but also help avoid potential hassles later on.
Check Compatibility and Power Requirements
Different Ring doorbell models require varying power sources. Some are powered by batteries, while others demand a wired connection for continuous power. Ensuring that your existing setup can accommodate these needs is crucial. For those models that need to connect to a traditional doorbell transformer, you’ll want to verify that your transformer provides adequate voltage, typically between 16-24V. For more specific requirements and details, you might find this step-by-step guide helpful.
Plan Your Installation and Setup
Your install process will greatly depend on whether you're placing a fresh Ring doorbell or working with an existing doorbell setup. If you have pre-existing doorbell wiring, assess whether it's compatible with the new device. Additionally, consider whether you'll need to drill holes for mounting or make adjustments to the mounting plate on your wall. These initial considerations are vital steps that will pave the way for a smoother installation process.
Gathering the Necessary Tools and Materials
Essential Items for a Seamless Doorbell Installation
Before embarking on your Ring video doorbell project, it’s vital to ensure you have the necessary tools and materials at the ready. A smooth installation process can be achieved with proper preparation, reducing unnecessary frustration and enhancing your overall experience. This careful approach enables you to focus on the right aspects, such as security and functionality, rather than missing components.
- Screwdriver Set: A standard and Phillips screwdriver will assist in securing the mounting plate to the wall.
- Drill and Bits: For creating mounting holes, especially if the installation surface is brick or concrete.
- Wire Strippers: These are crucial for adjusting existing wires to fit your Ring doorbell setup.
- Voltage Tester: To confirm the doorbell’s power lines have been switched off before starting the wiring step, ensuring safety.
- Level: A small level is handy for placing the doorbell correctly on the wall, ensuring it looks neat and professional.
- Tape Measure: For accurately measuring the distance between doorbell components, like the transformer and chime.
While gathering the tangible tools, remember also to arm yourself with critical knowledge. This involves understanding the role of key components such as the doorbell transformer in converting the household power to the right voltage required by your wired doorbell. Recognizing these elements lays the groundwork, ensuring that your doorbell install not only connects smoothly but operates efficiently.
Equipping yourself with this arsenal guarantees a smoother installation, paving the way for a seamless transition to the wiring stage, which involves connecting wires properly to the transformer and chime. Thorough preparation allows you to navigate your doorbell wired setup with confidence and ease.
Assessing Your Existing Doorbell Wiring
Evaluating Your Existing Wiring Setup
Before diving into the installation process, it's essential to take a closer look at your current doorbell setup. This step will help ensure a smooth transition to your new video doorbell.
Check Existing Wires
Start by examining the wires that are already in place. You'll need to ensure they are in good condition and can handle the power requirements of your new device. Look for any wear and tear or corrosion. If the wiring looks questionable, you might want to consult an electrician before proceeding.
Locate the Doorbell Transformer
Next, locate your existing doorbell transformer. This small device is usually mounted near your circuit breaker or somewhere in your home where it can connect to the wired doorbell system. Ensure the transformer is functional and meets the power specifications for your new video doorbell.
Inspect the Doorbell Chime
Your current doorbell chime is another crucial component. Make sure that it’s working correctly and compatible with the new system you’re planning to install. Compatibility issues could mean you need to replace the chime or consider other solutions.
Identify Mounting Locations
Consider where you will physically mount your new device. Assess the wall space around your existing doorbell for suitability. Mark the mounting holes with a pencil, ensuring they align with your mounting plate. This step is crucial when you drill holes for the installation.
By carefully assessing these elements, you'll set yourself up for a successful wired doorbell installation, ensuring that your new device is both safe and operational. Understanding these factors can also help you better anticipate any potential costs related to modifications or repairs.
Step-by-Step Wiring Guide
Preparing the Wires Correctly
Once you have identified your Ring Doorbell model and gathered all necessary tools and materials, it’s time to get hands-on with the wiring. Start by carefully examining your existing doorbell wiring. This step is crucial as it determines how you’ll connect your new device.
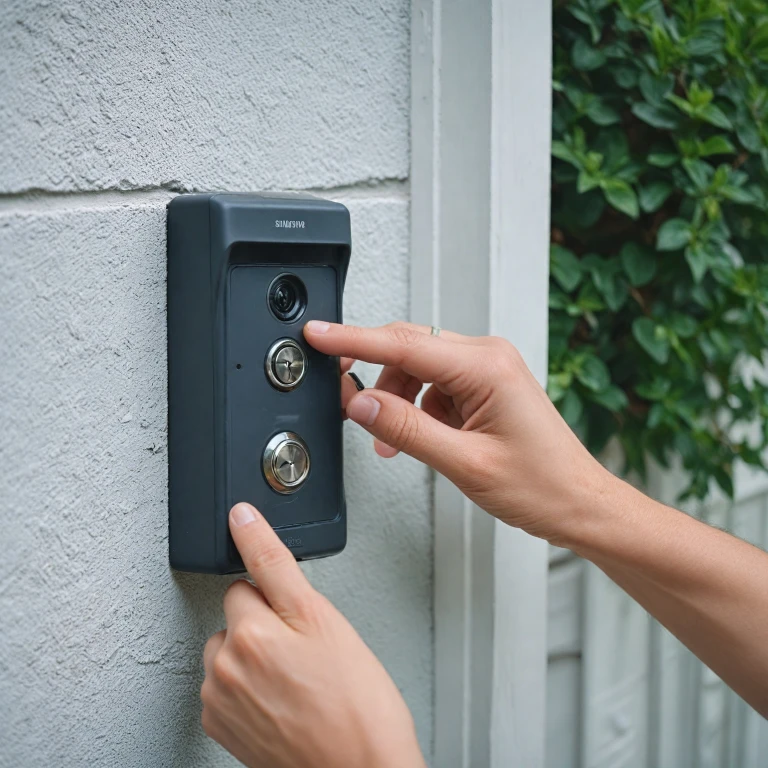
Step-by-Step Connection Process
Begin by turning off the power at the circuit breaker to ensure your safety and compliance during the installation. This precaution is particularly important to prevent any electrical mishaps. Once the power is off, remove your existing doorbell from the wall, revealing the wiring you’ll work with.
Following this, drill holes for the mounting plate if needed. Align it at the preferred height and location. Feed the wires through the holes, making sure they’re not tangled or damaged as you maneuver them.
Next, identify the doorbell wires—usually one is connected to the transformer and the other to the chime. Carefully connect the wires by matching them according to your Ring device's instructions. You want to ensure a tight connection; this might involve securing them with provided screws or connectors.
When everything is securely connected, attach the Ring Doorbell to the mounting plate. Ensure that it is firmly in place before proceeding. Lastly, restore power at the circuit breaker and allow your device to power up. If wired correctly, the video doorbell should light up, indicating it’s receiving power.
Double-Check for Proper Operation
Once your Ring Wired Doorbell is installed and powered, test the device by pressing the button and checking if your existing chime sounds. This also gives you a chance to see if the video feed and connection are stable. If any issues arise, refer to troubleshooting resources.
Troubleshooting Common Wiring Issues
Resolving Wiring Problems
The process of wiring your Ring doorbell can seem straightforward, but sometimes, things may not go as smoothly as planned. Whether it’s an issue with power supply, connection stability, or simply getting the desired functionality out of your system, these common troubleshooting tips should help resolve most home installation hiccups.
No Power to the Doorbell
If your video doorbell isn't powering on, first ensure that the circuit breaker connected to your doorbell transformer is switched on. It's crucial to check the transformer itself; a faulty transformer might need replacement. Additionally, verify that all wires are properly connected and that the doorbell battery, if applicable, is charged.
Unresponsive Chime
Should your doorbell chime not respond upon installation, consider checking the chime settings on your app and ensure it's not set to "silent" mode. Examine the wires leading to the chime and make sure they are connected securely. Sometimes, wiring might be reversed or loose, requiring readjustment. Also, confirm that the chime is compatible with your wired doorbell system.
Video Quality Issues
If you experience poor video quality, the problem might stem from inadequate power supply. Confirm that the wiring to your wall outlet or transformer is intact and that the transformer’s voltage output matches the Ring video doorbell’s power requirements. An alternative step to improving video quality involves checking your Wi-Fi connection strength.
Intermittent Connection
Intermittent connectivity can be a sign of loose wires. Double-check every screw connecting wires behind the mounting plate to ensure they are secure. The Ring app will often alert you to connectivity problems, so pay attention to any notifications regarding weak connections.
Working with Existing Wiring
Issues might arise from utilizing the existing doorbell wiring, particularly in older homes. Verify that the wires aren't corroded or damaged. In some cases, hiring a professional electrician can save you time and effort, ensuring that the wires meet current safety and compliance standards.
Mastering these basic troubleshooting techniques can significantly enhance the utility and security offered by your doorbell install, providing peace of mind with each step of your installation journey. Remember, careful assessment of your setup can preemptively address many of these concerns before installation is completed.
Ensuring Safety and Compliance
Prioritizing Safety Measures and Adhering to Standards
Proper installation of your wired doorbell is essential not only for functionality but also for safety. Here are some fundamental steps to ensure that your video doorbell install is both safe and compliant:- Turn Off Power: Before you embark on connecting or adjusting any wires related to your doorbell wiring, ensure that the power is off. Head to your circuit breaker and switch off the relevant circuit. This step is crucial to prevent any accidents during installation.
- Verify the Voltage: Whether you are working with a doorbell transformer or directly from a wall outlet, it's critical to ensure that the power supply matches the required voltage for your specific doorbell model. This mismatch can lead to operational failures or cause damage.
- Secure the Wiring: When you assess your existing doorbell wiring, make sure all wires are secure and free from damage. This involves carefully mounting the wires without any exposed metal that could lead to shorts or potential shocks.
- Use Appropriate Tools: Gather tools like a voltage tester and wire stripper to ensure precision and safety during your doorbell install process. These help in both accurate wire stripping and verifying de-energization.
- Install Properly Rated Components: Ensure that all components, such as the chime, transformer, and plug, are suitable for your wired doorbell model. Consulting the instruction manual or a certified electrician is advisable if you're uncertain.
- Secure Connections: When you finish mounting the doorbell and connecting it, tighten all screws securely. Loose connections can be a source of electrical faults or inconsistent power delivery.
- Adhere to Local Building Codes: It's important to ensure that your wiring setup complies with local building codes and regulations. Non-compliance may not only hinder performance but could also void warranties or result in fines.